
This guide is for Conference Managers, Editors, Track Editors, and publication staff using Leconfe 1.5. It explains how to give users the correct access, understand submission stages, manage peer review and revisions, communicate with authors, prepare proceedings, and publish an article.
Menu labels and available actions can vary according to your role, the scheduled conference configuration, enabled plugins, and the submission’s current stage.
What You Will Learn
After completing this guide, you should be able to:
- create or find a user and assign the minimum required role;
- identify where a submission is in the editorial workflow;
- prepare review files, assign reviewers, and manage review rounds;
- request revisions and record an editorial decision;
- complete publication metadata, permissions, payments, and additional data;
- assign an article to a proceeding and publish it safely; and
- use discussions, withdrawal controls, and activity information to keep an auditable record.
Before You Start
Make sure that:
- you are signed in to the correct conference website;
- you are opening the correct scheduled conference;
- your account has the required Manager, Editor, or Track Editor role;
- the conference workflow, review method, email, and payment settings have been configured;
- the tracks, submission forms, review forms, and important dates are ready; and
- you know who is authorized to make decisions, settle payments, and publish articles.
Important: Use the minimum role needed for each person. Routine editorial work normally does not require full Manager access. Role names can also be customized, so follow the permissions configured on your installation if a label differs from this guide.
Understand Manager and Editor Responsibilities
The first user created during installation normally has Manager access. A Manager configures the conference, manages users and roles, and can oversee the entire workflow. Editors and Track Editors work with submissions according to their assigned scope and permissions. Reviewers evaluate assigned files, while authors submit and revise their own work.
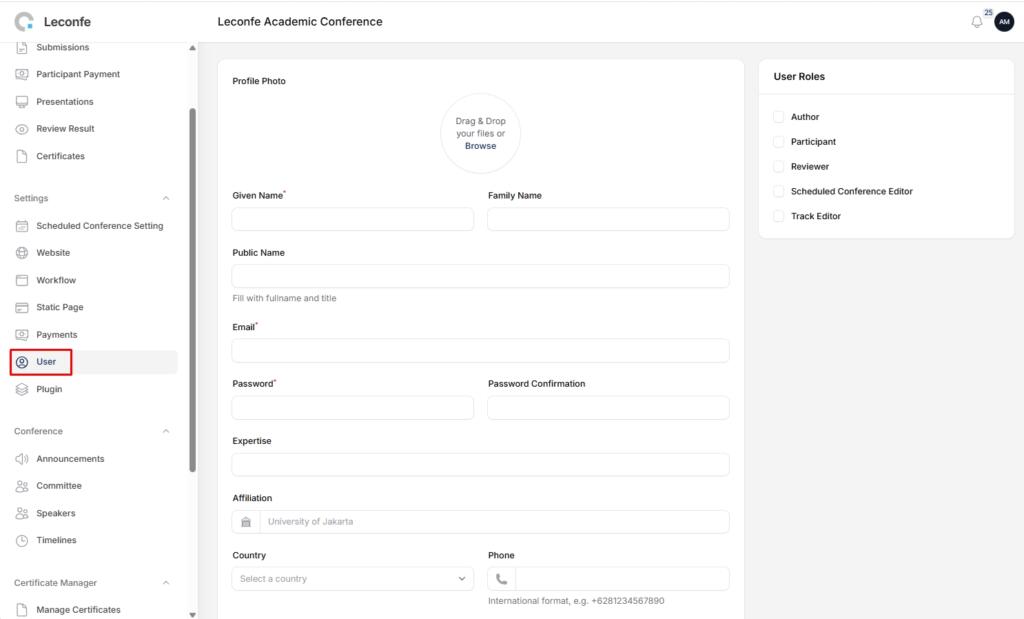
A role can be scoped to the overall conference or to a scheduled conference. If a user can sign in but cannot see the expected submissions or actions, first confirm that the role was assigned to the correct scheduled conference.
Create Users and Assign Roles
Method 1: Create a New User
- Open the administration area and go to Users.
- Select New User.
- Enter the user’s name, email address, and any other required account information.
- Assign the appropriate role, such as Editor, Track Editor, or Reviewer.
- If the form asks for a scheduled conference, select the conference in which the user will work.
- Save the user and verify that the account or invitation was created successfully.
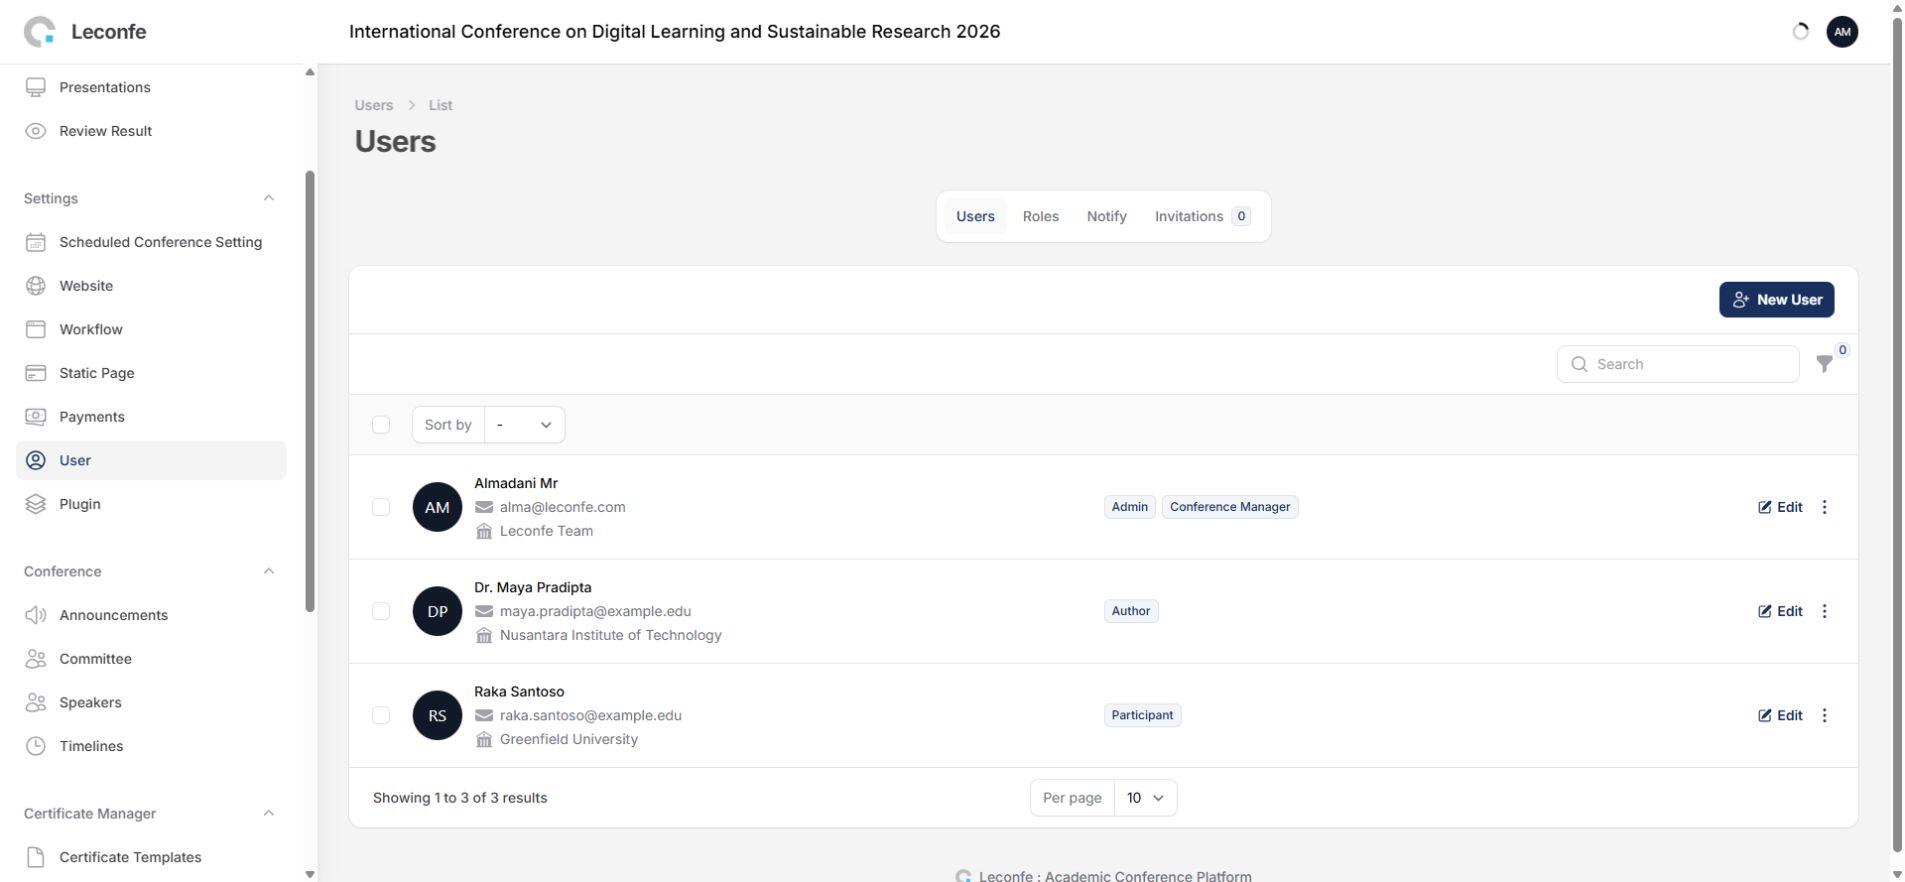
Method 2: Add a Role to an Existing User
- Go to Users and search for the existing account.
- Open the user’s record.
- Add the required role and scheduled-conference assignment.
- Save the change.
- Ask the user to refresh the Dashboard or sign in again, then confirm that the expected menu and submissions are visible.
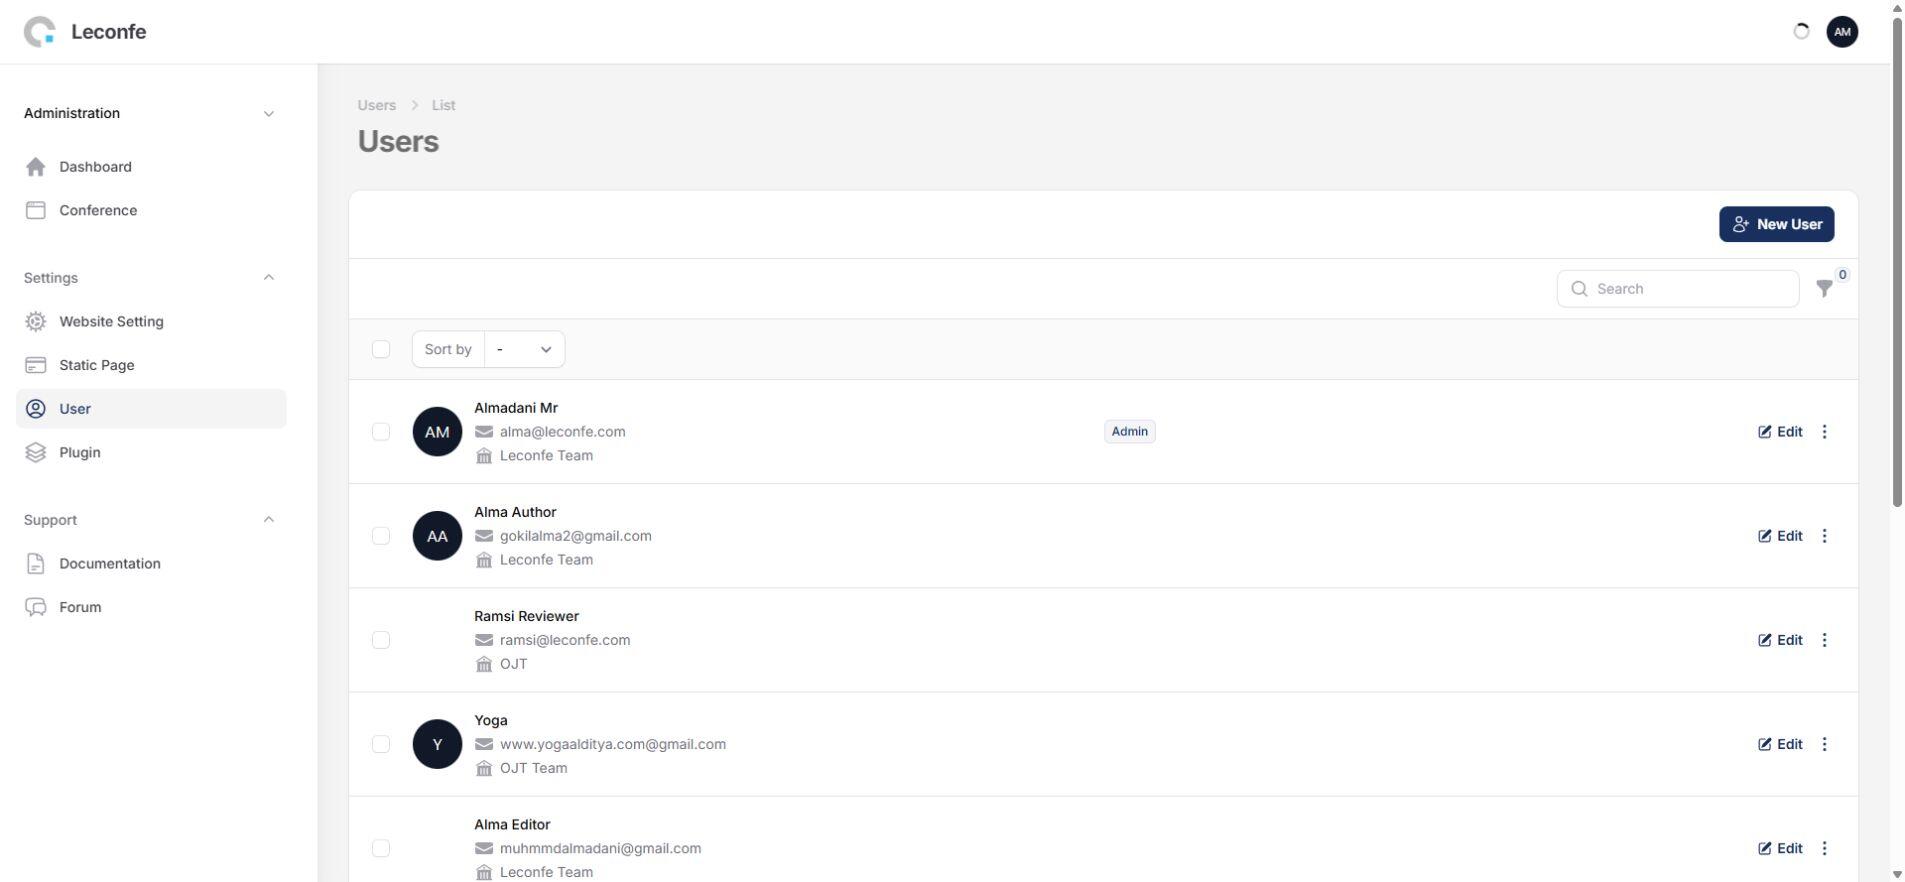
Leconfe 1.5 note: Invitation emails use the scheduled-conference context more consistently. Before sending an invitation, verify the selected conference, recipient, and role so the message identifies the correct event.
Understand Submission Stages and Statuses
Before taking an action, open the submission and check its current stage and status. The available workflow can include:
- Submission / Call for Abstract: initial files and metadata are received and checked.
- Peer Review: review files, reviewer assignments, review rounds, revisions, and editorial decisions are managed.
- Presentation: accepted presenters and presentation materials are managed when this stage is enabled.
- Editing / Publication: final files, metadata, permissions, proceeding assignment, and publication are completed.
You may also see statuses such as Incomplete, Queued, On Review, On Presentation, Editing, Scheduled, Published, Declined, Payment Declined, or Withdrawn. Do not rely only on the queue name: open the submission and confirm its stage, status, latest review round, payment condition, and assigned people before acting.
Prepare Proceedings and Publication
A proceeding is the publication container for one or more accepted articles. You may create it before editorial work begins, but an article should only be published after the editorial and publication checks are complete.
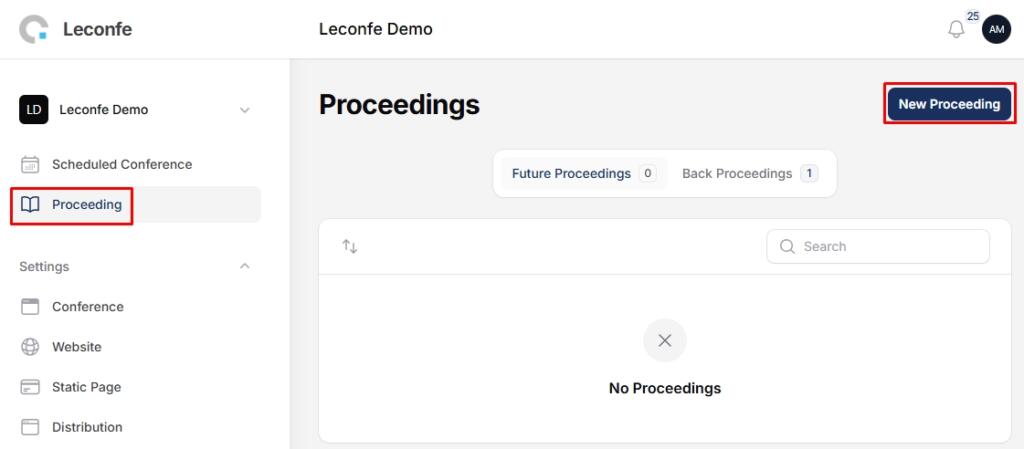
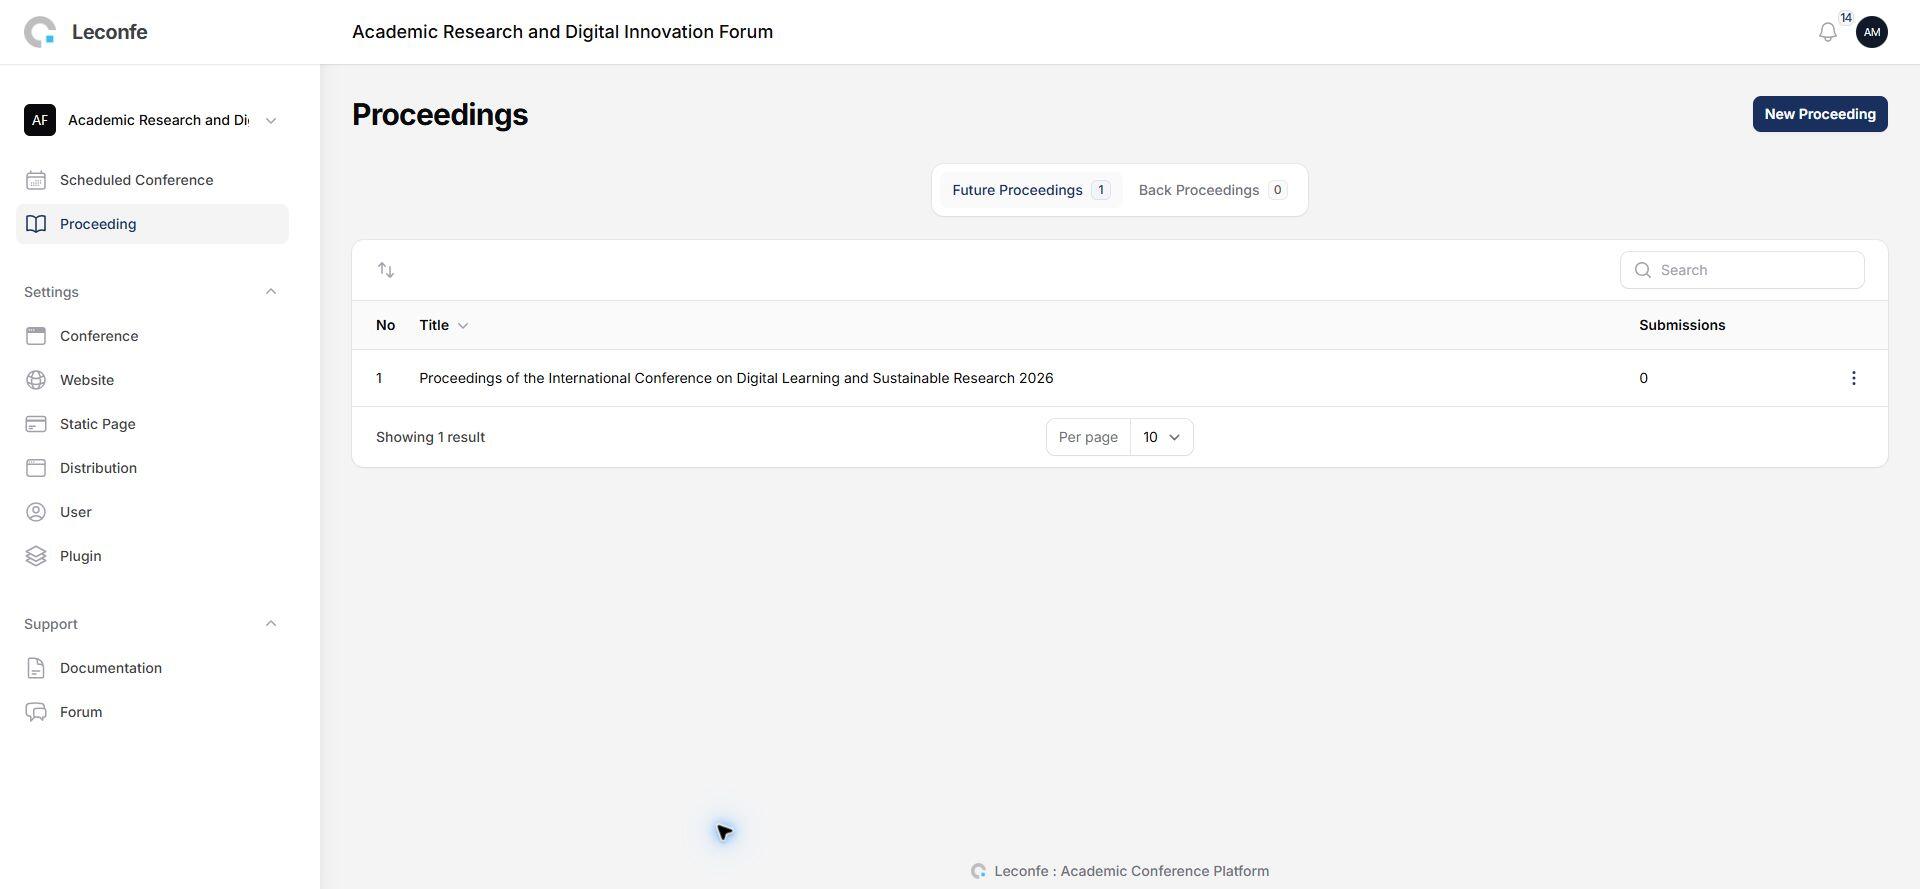
Create a Proceeding
- Open the conference administration area.
- Go to Proceedings.
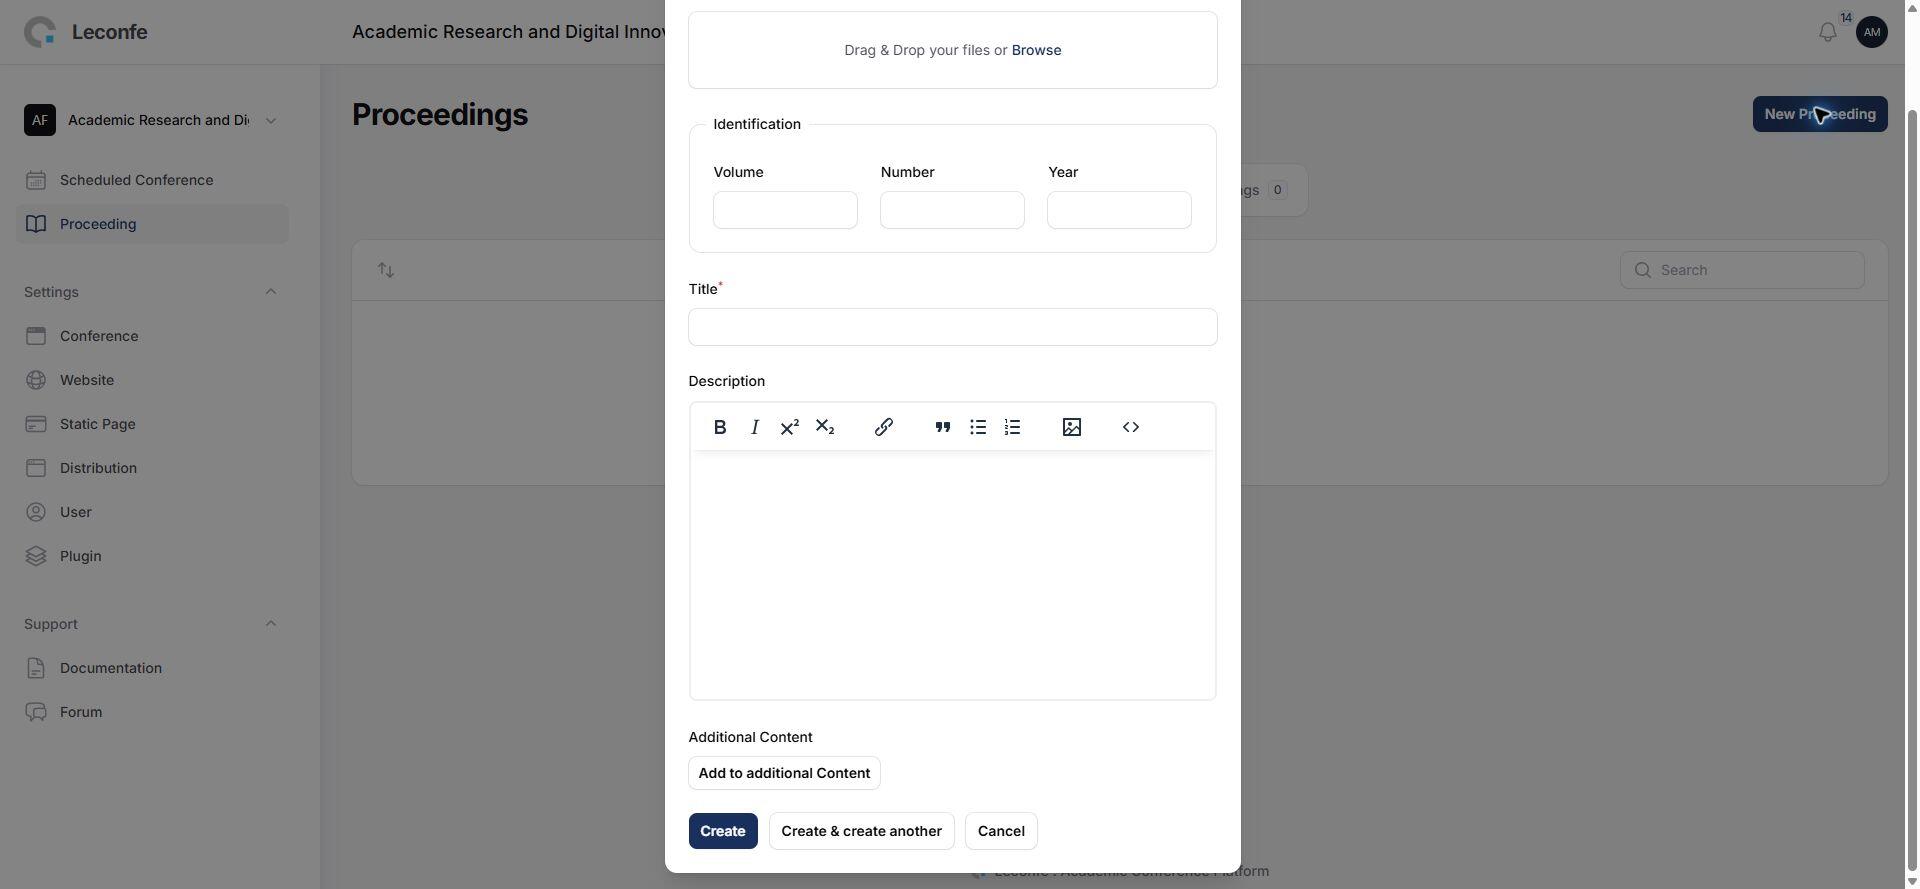
- Select New Proceeding.
- Enter the required title, description, publication information, and other displayed fields.
- Choose the appropriate status and save.
Choose the Proceeding Status
- Draft: use while preparing or checking the proceeding. It should not be treated as the final public publication.
- Published: use when the proceeding is ready to be publicly available.
An article and its proceeding have related visibility. If an article does not appear publicly, check both the article’s publication state and the proceeding’s status.
Create or Import the Submission Record
Use the standard submission workflow whenever the author should complete the full form and validations. An authorized editor may also use an administrative shortcut such as Quick Submit when that optional feature is installed and enabled.

Quick Submit is not a substitute for publication checks. Regardless of how a record is created, confirm the contributors, metadata, files, permissions, additional data, payment condition, and proceeding assignment before publication. For the author’s complete submission route, see Submitting and Managing a Paper as an Author.
Open the Correct Scheduled Conference and Submission
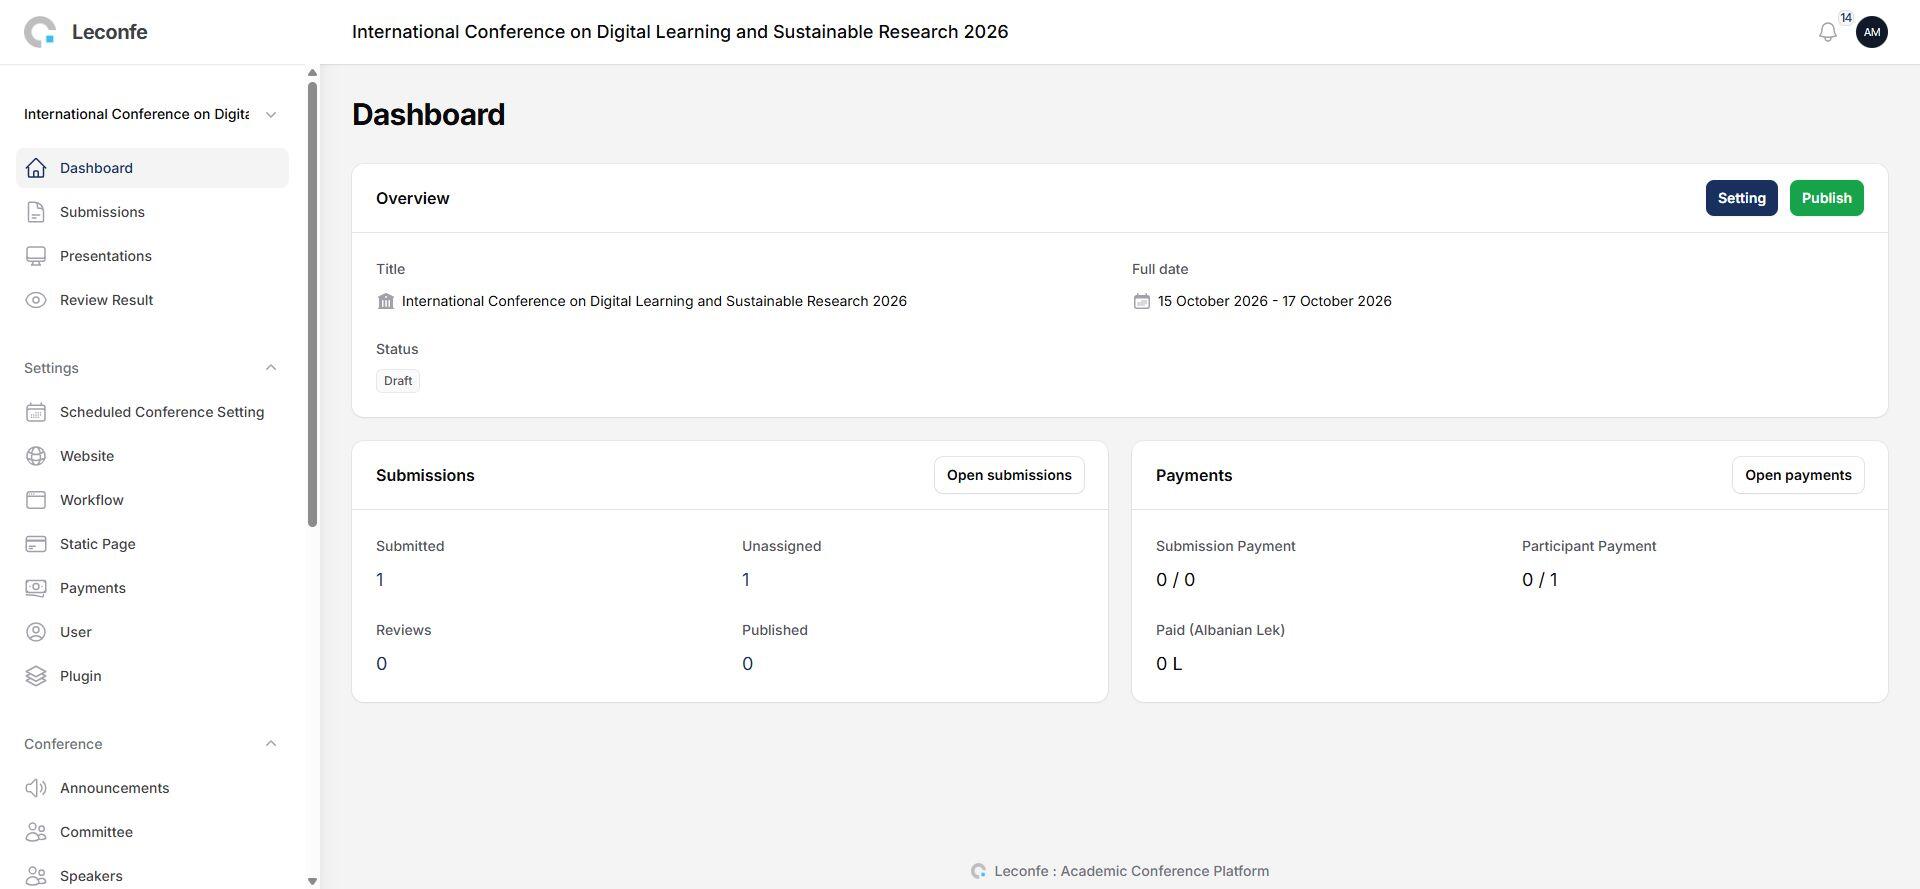
- Open the correct scheduled conference.
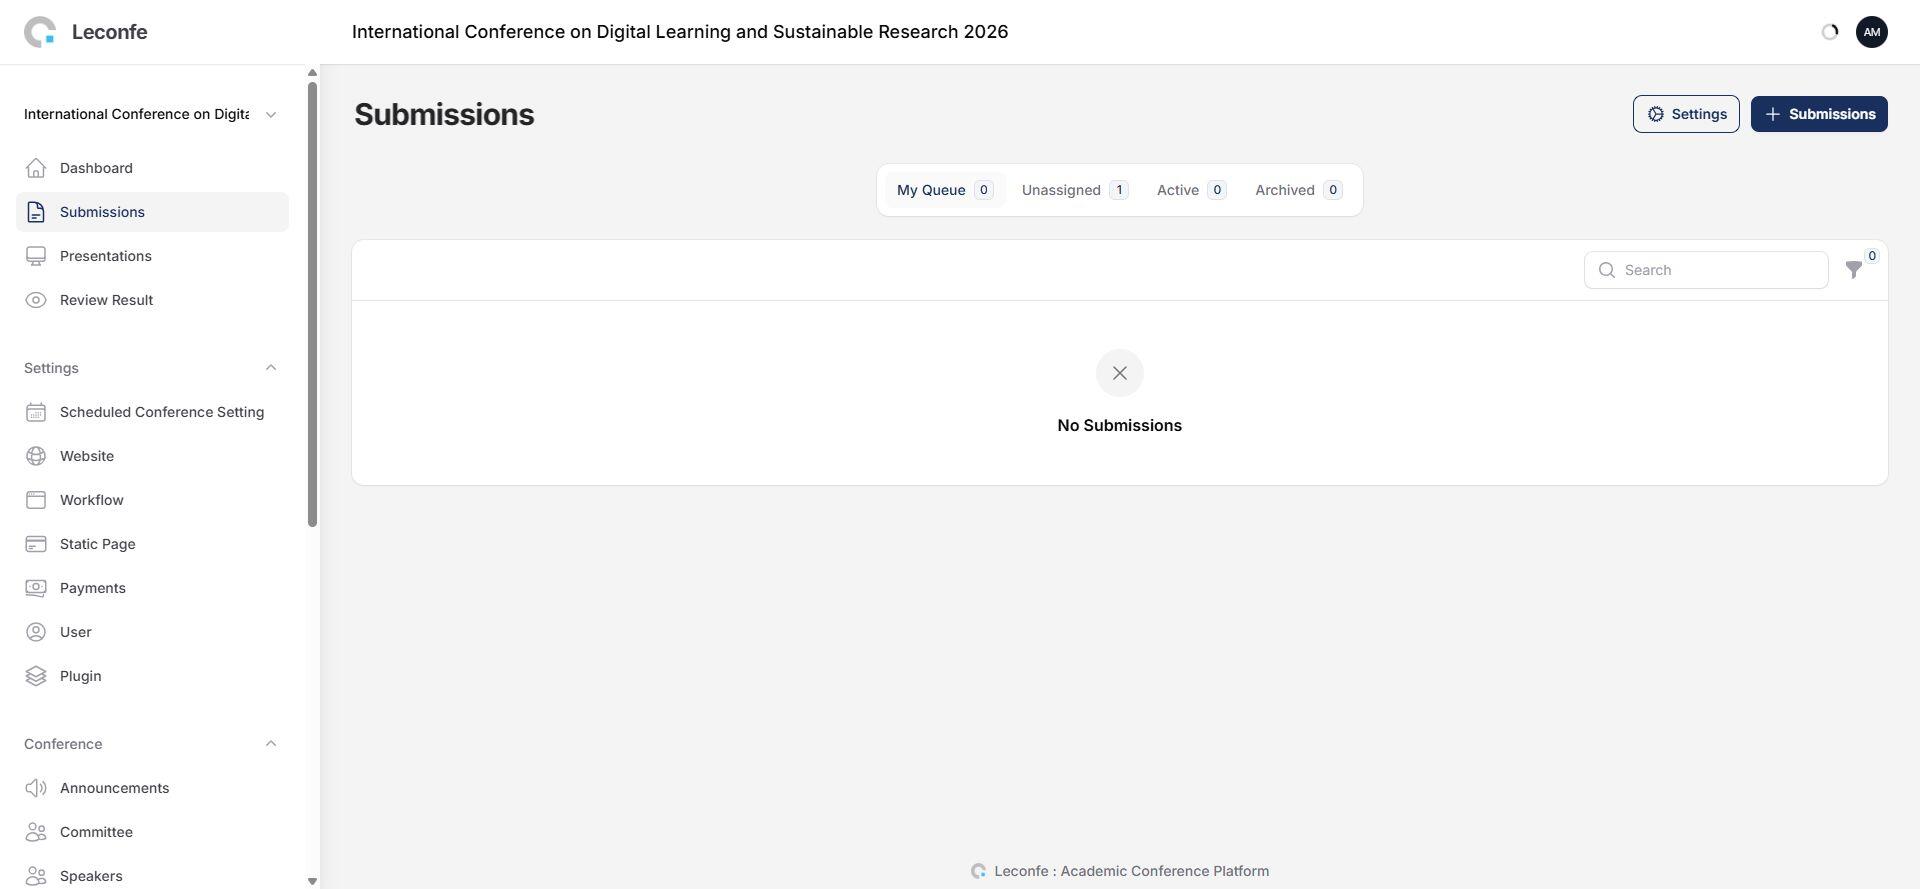
- Go to Submissions.
- Use the available queue, filters, or search to find the article.
- Open the submission and confirm the title, author, track, stage, and status.
- For publication, make sure the submission has reached Editing.
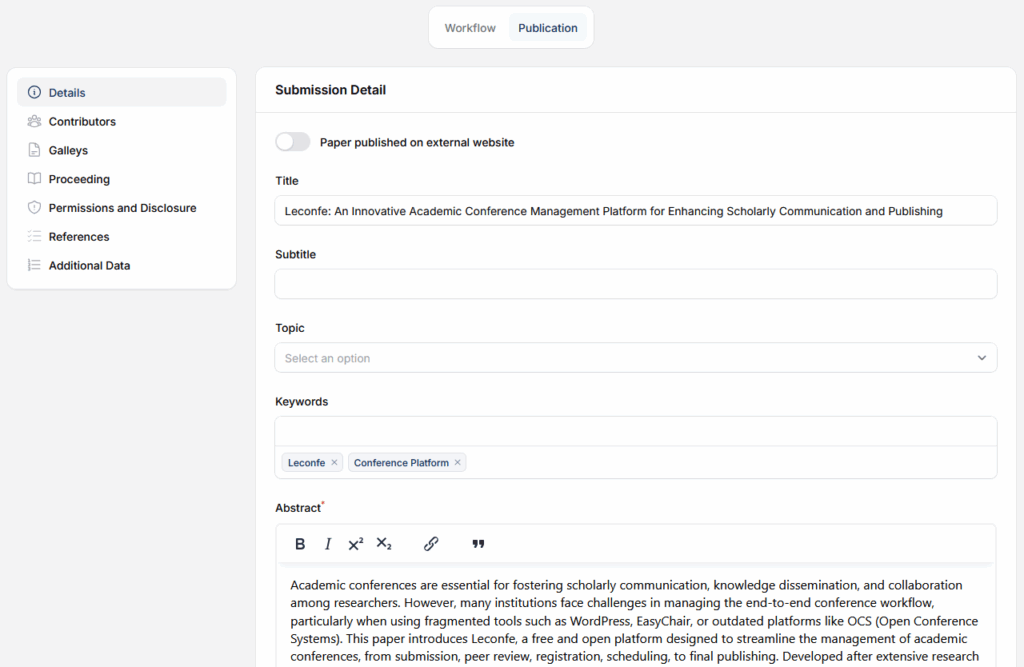
Complete the Publication-Readiness Check
Review all fields displayed by your conference. Depending on the configuration, this can include:
- title, subtitle, abstract, and keywords;
- authors, co-authors, affiliations, and contributor order;
- track, article type, language, pages, and identifiers;
- final publication files and any supplementary files;
- copyright holder, copyright year, license, and disclosure text;
- required additional submission data;
- payment status when payment gates are enabled; and
- the proceeding to which the article will belong.
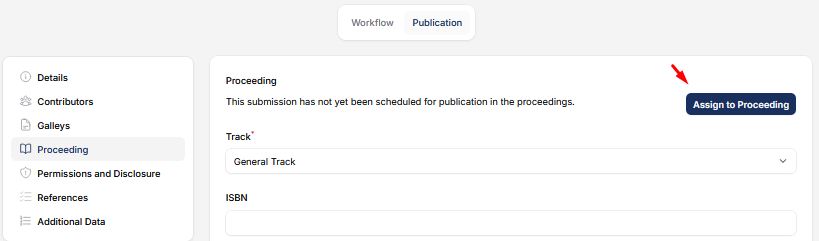
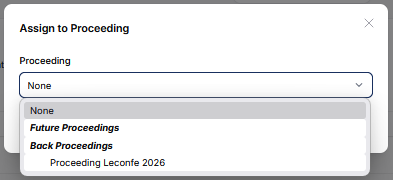
Assign the Article to a Proceeding
- Open the submission in the Editing or publication stage.
- Select the publication action for assigning a proceeding.
- Choose the correct proceeding.
- Save the selection.
- Reopen or refresh the submission and verify that the proceeding name is displayed.
Publish, Schedule, or Return the Article for Correction
- Preview the public article where a preview action is available.
- Check the title, contributor order, abstract, files, permissions, pages, and proceeding one final time.
- Select Publish Now, or the scheduling action when your workflow provides one.
- Review any author-notification option and message before confirming.
- Verify the success message and open the public page.
If a published or scheduled article must be corrected, use Unpublish or Unschedule only if your role is authorized. Record the reason, make the correction, preview again, and republish. Avoid silently changing a published record without an agreed editorial procedure.
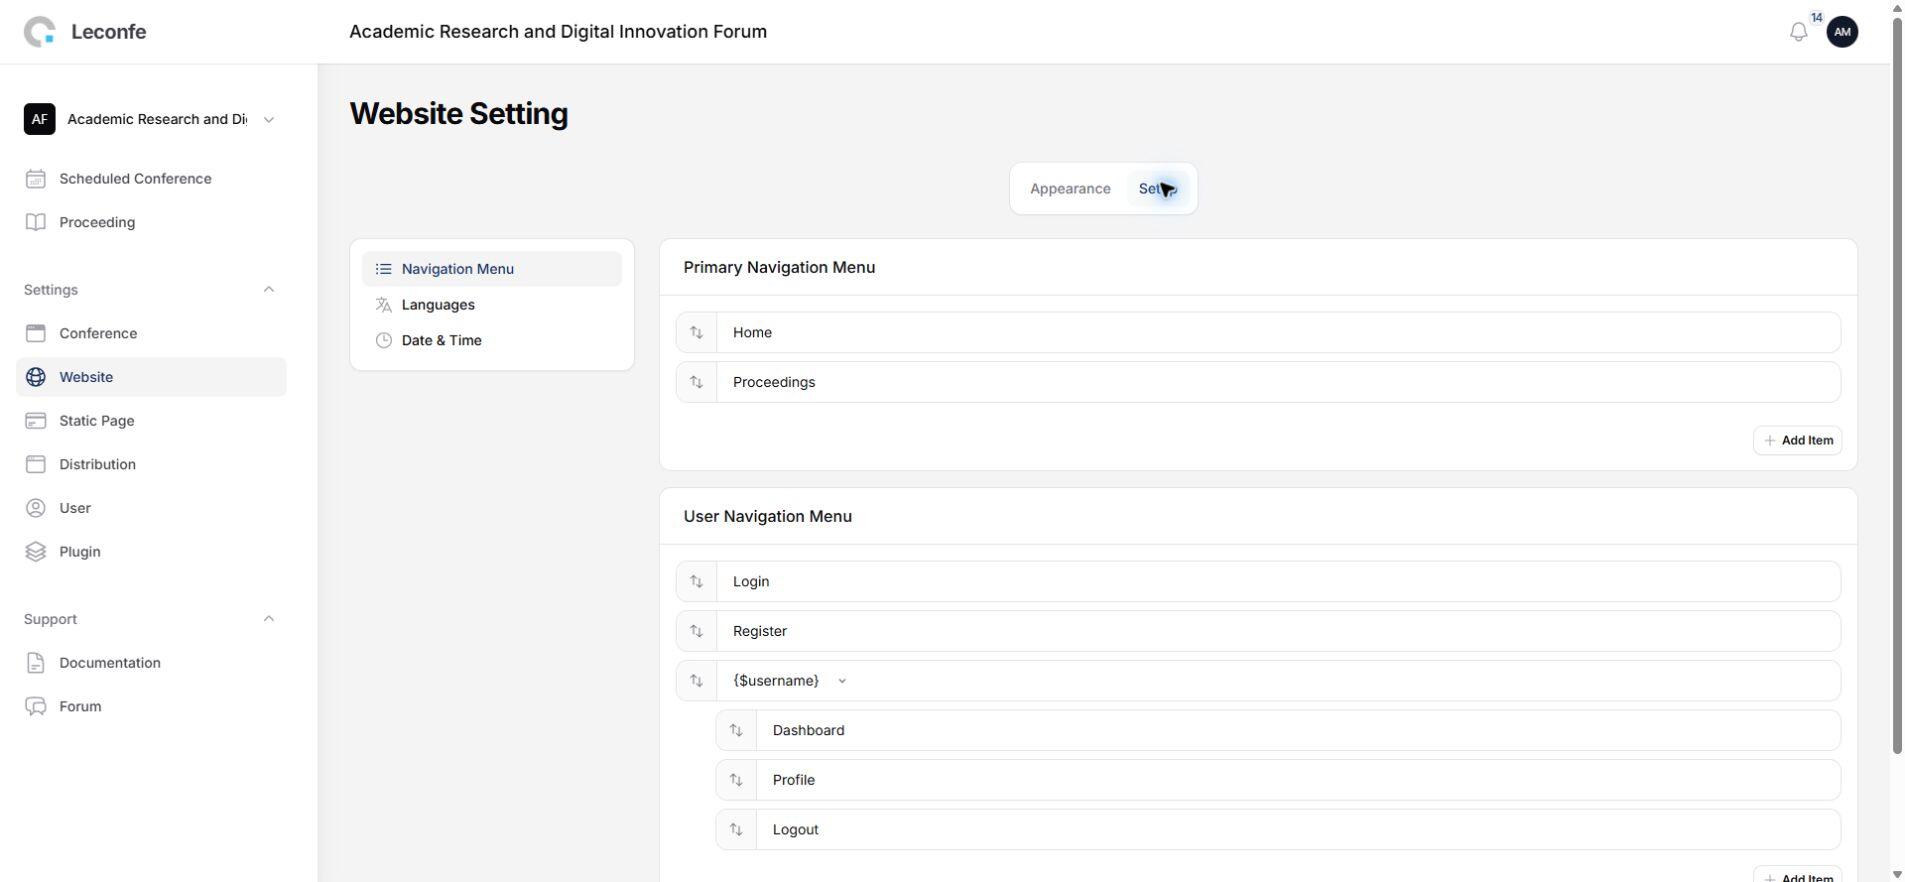
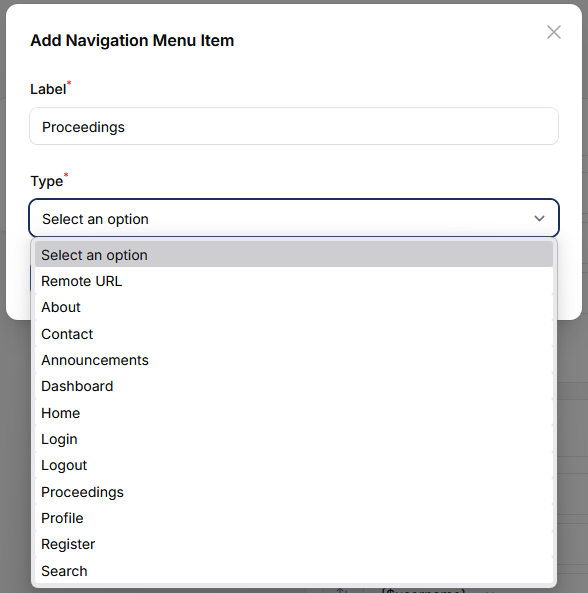
Show Proceedings in Website Navigation
- Go to Website > Navigation Menu.
- Open the menu setup area.
- Add the Proceedings destination or the applicable publication page.
- Arrange the menu position and save.
- Open the public website in a separate view and test the menu link.

Manage Peer Review in Leconfe 1.5
Leconfe 1.5 uses review rounds so each evaluation cycle has its own reviewers, files, revisions, and discussions. When a submission enters peer review, Round 1 can be created automatically. Always confirm the selected round before assigning a reviewer or recording a decision.
Prepare the Active Review Round
- Open the submission and select the Peer Review stage.
- Confirm the active round, such as Round 1.
- Check which author files are available to the editor.
- Select or upload only the files that reviewers are permitted to see.
- Remove identifying information from files when the configured blind-review method requires it.
Protect confidential information. Do not share payment records, private discussions, author-only files, or files containing identities with reviewers unless the review method and conference policy allow it.
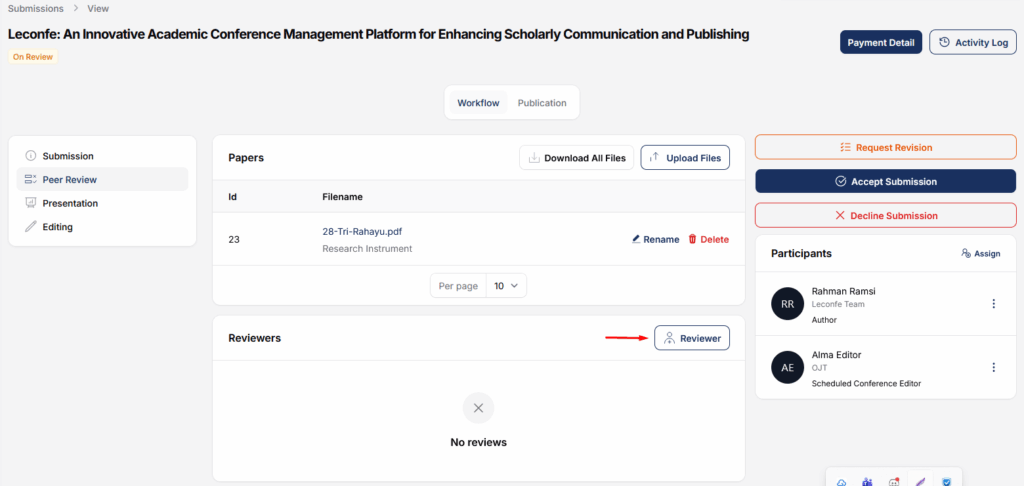
Assign a Reviewer
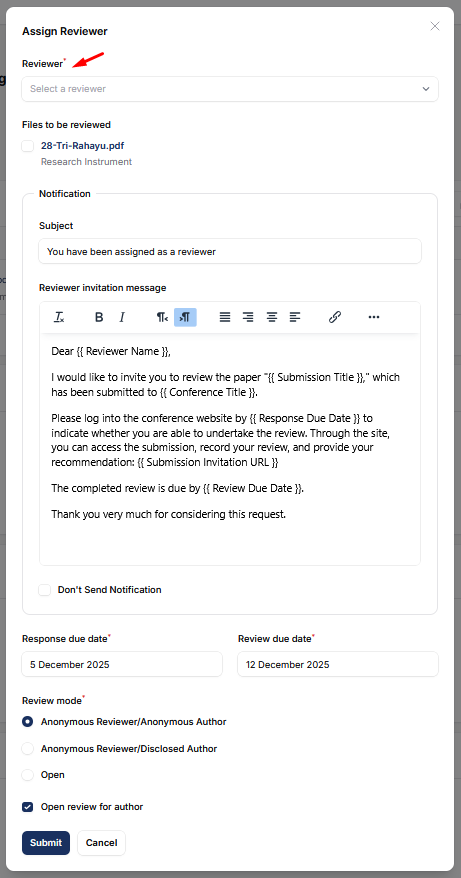
- In the active review round, find the reviewer-assignment section and select Add Reviewer.
- Search for a reviewer assigned to the correct scheduled conference.
- Confirm the review method, such as single-blind or double-blind, when this control is displayed.
- Select the review files the reviewer may access.
- Set the response deadline and review deadline where provided.
- Review the invitation message, recipient, conference name, and article information.
- Send the invitation and confirm that the reviewer appears in the round’s reviewer list.
Monitor the Assignment
Use the reviewer list to check whether an invitation is pending, accepted, declined, overdue, or completed. If a reviewer declines, assign a replacement in the same active round. Before sending a reminder or resending an invitation, confirm the current status so the reviewer does not receive an unnecessary duplicate message.
For the reviewer’s step-by-step experience, see Completing a Peer Review in Leconfe. Review criteria and weighted scoring must be configured before assignments are sent.
Request a Revision or Start a New Review Round
These actions have different purposes:
- Request Revision: send the author a revision request and instructions. In the Leconfe 1.5 review-round workflow, this communication does not by itself have to create another round.
- New Review Round: use when the revised work must enter another formal evaluation cycle. Name the round, choose the files to include, and decide whether to notify the author.
Files, reviewer assignments, revisions, and discussions are associated with their review round. Select the correct round when reviewing history, and perform new work only in the current actionable round.
Record the Editorial Decision
After checking the completed reviews and the conference policy, an authorized editor can take the appropriate decision:
- Request Revision: explain the required changes and deadline.
- Accept: move the submission toward Presentation or Editing according to the configured workflow.
- Decline: record the decision and optionally notify the author.
- Start Next Review Round: open another evaluation cycle when additional peer review is required.
Before sending a decision email, check the recipient, subject, decision wording, included review information, attachments, and selected review round. Leconfe 1.5 includes fixes to review and decline-notification handling, but your site’s outgoing email still needs to be configured and tested.
Configure Editor Guidance
Editor Guidance gives editors and track editors a shared reference for conference-specific decisions. Add concise instructions such as scope rules, screening criteria, expected turnaround time, conflict-of-interest policy, decision authority, and escalation contacts.
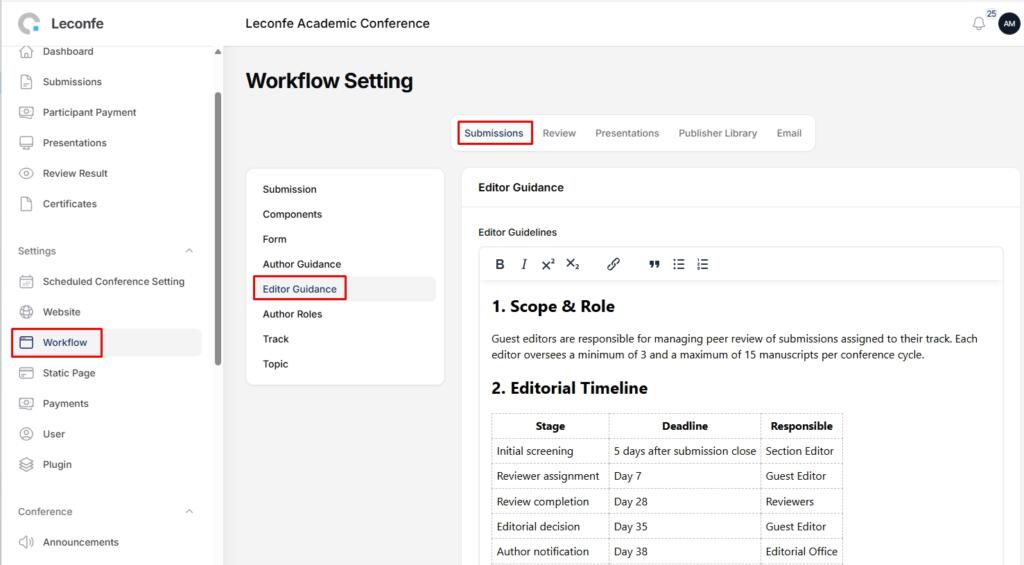
Review the guidance before opening submissions and update it whenever the conference policy changes. Do not place passwords, private financial details, or other secrets in guidance text.
Complete Publication Data
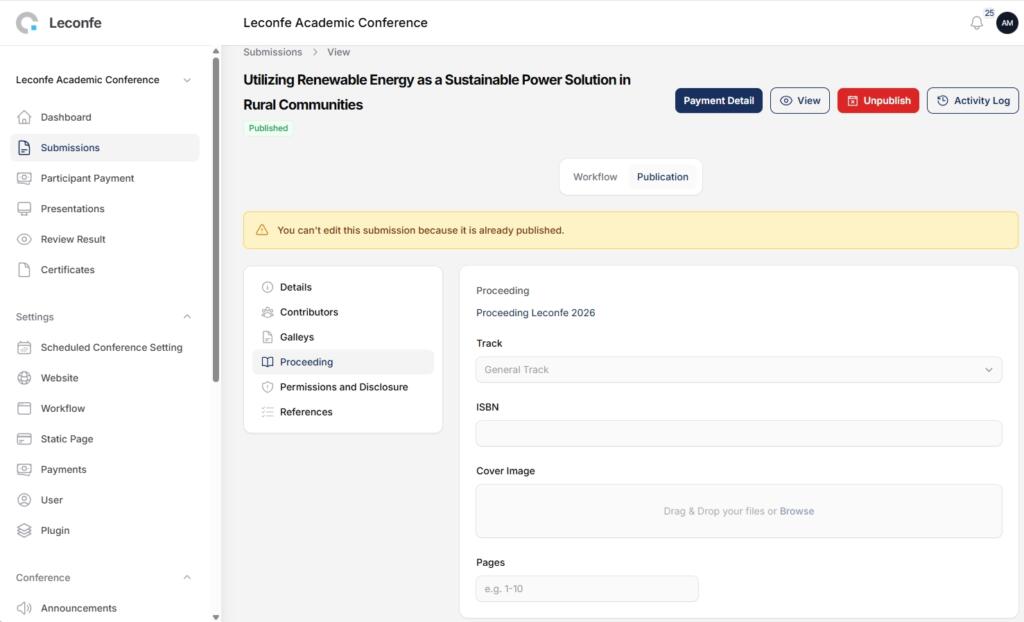
In the submission’s publication area, complete the fields displayed by your conference. Common items include the Track, ISBN, cover image, and article pages. Check that values match the final proceeding and do not conflict with metadata entered elsewhere.
Manage Copyright, License, and Disclosure
Open Publication > Permissions and Disclosure and review the values that will be associated with the public article. Depending on the conference configuration, editors may be able to override inherited defaults for a specific submission.
- Confirm the copyright holder and year.
- Select the correct license and license URL, if applicable.
- Check disclosure or rights statements.
- Use an override only when the article genuinely requires different terms.
- Obtain the necessary authorization before changing rights information supplied by an author.
Use Discussions with Authors
Discussions keep questions, replies, and supporting files attached to the submission. Depending on the workflow, discussions can appear in the Submission, Peer Review, Presentation, or Editing stage. In peer review, make sure you are viewing the intended review round.
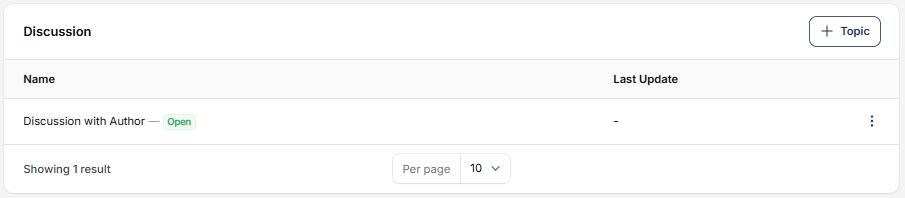
With a discussion, you can:
- Create a topic: use a specific name such as “Metadata Correction” or “Round 1 Revision Query.”
- Send a message: state the requested action, responsible person, and deadline.
- Attach a file: include only files that the participants are authorized to access.
- Receive replies: keep the conversation in the same topic where possible.
- Close the topic: close it after the issue is resolved.
Leconfe records the discussion in the submission and can send notifications according to the configured mail system. Because email delivery can fail or be delayed, treat the in-app discussion history as the authoritative record.
Manage Submission Payments
When submission payments are enabled and your role is permitted to view them, use Payment Detail to review the fee, payment status, add-on items, invoice, and receipt. The available controls depend on the billing settings and the submission’s payment workflow.
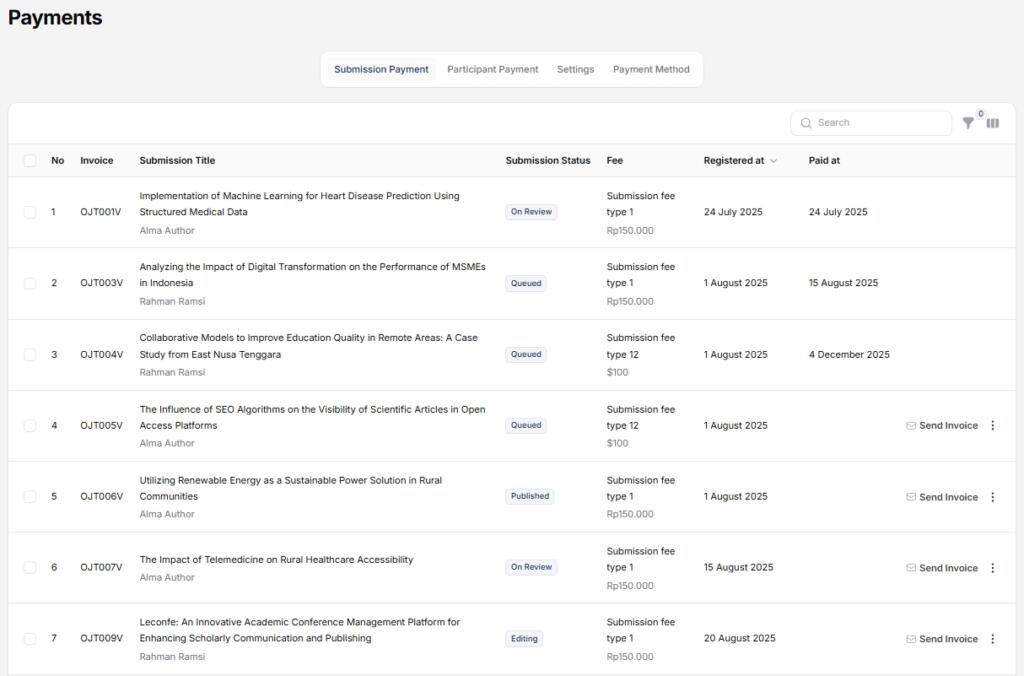
- Payment Fee: the configured fee and amount.
- Payment Status: whether the payment is unpaid, paid, failed, or otherwise recorded by the configured workflow.
- Add-on Items: additional selected items and charges.
- Invoice: available when invoice generation is enabled.
- Receipt: available after settlement when receipt generation is enabled.
Use Mark as Paid carefully. This is a privileged reconciliation action for a payment verified outside the automatic gateway, such as an approved bank transfer. Confirm the amount, payer, external reference, and payment date before saving. Do not use it merely to bypass a payment requirement.
For conference-level setup, see Configuring Payment Settings in Leconfe.
Manage Additional Submission Data
Conference managers can configure extra fields under Workflow > Submissions > Components > Additional Data. These fields collect information that is not covered by the standard submission form.
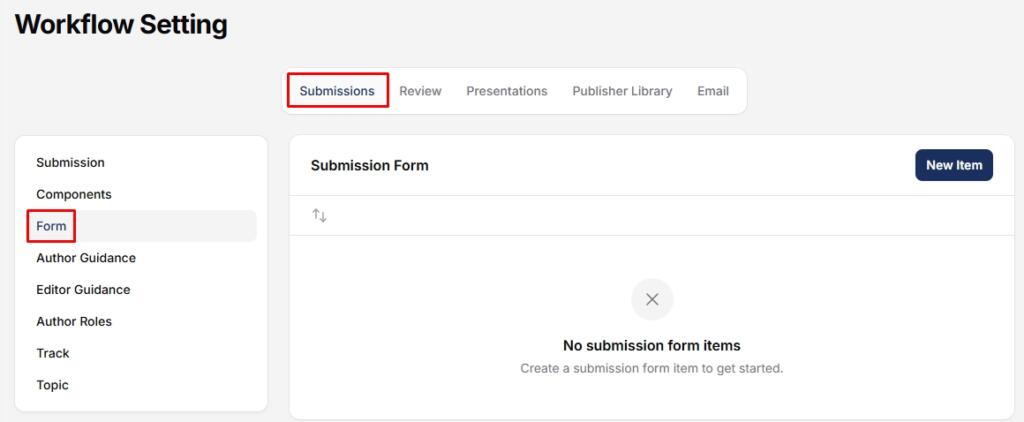
- Short Text: a single-line value such as a reference number.
- Long Text: a longer statement or note.
- Checkbox Options: one or more selections.
- Radio Buttons: one selection from a visible list.
- Dropdown: one selection from a compact menu.
- File Upload: a supporting document such as proof of eligibility.
Make each field required only when the information is genuinely necessary. Authors complete these fields during submission, and authorized editors can review them under Publication > Additional Data. If an editor corrects author-supplied data, record the reason in a discussion or other approved audit channel.
Handle Withdrawal Requests
When an author requests withdrawal, an authorized editor or manager should:
- open the correct submission and read the withdrawal reason;
- check whether reviews, payments, presentations, or publication actions have already occurred;
- follow the conference withdrawal policy;
- accept or reject the request using the available action;
- review the notification message before sending it; and
- confirm that the final status is recorded correctly.
Do not delete a submission to represent a withdrawal. A recorded withdrawal preserves the history and makes the outcome understandable to the author and conference team.
Use Activity and Administrative Tools Safely
Where your permissions allow it, use the Activity Log and available mail or audit information to check who changed a stage, sent a notification, recorded a decision, settled a payment, or published an article. This is especially useful when a user reports that an email was not received or a submission appears in an unexpected state.
Leconfe 1.5 may also allow an authorized scheduled-conference editor or administrator to sign in as another user for troubleshooting. Use this only under your organization’s support policy. Do not change the user’s profile, submit a decision, upload files, or accept an agreement while acting as that user unless explicitly authorized and documented.
Troubleshooting
The user can sign in but cannot see the submission
- Confirm the role is assigned to the correct scheduled conference.
- Confirm the submission’s track is within the editor’s assigned scope.
- Check the queue, filters, search term, stage, and status.
- Ask the user to refresh or sign in again after a role change.
Add Reviewer or a decision action is missing
- Confirm that the submission is in Peer Review.
- Select the current actionable review round.
- Verify that your role has reviewer-assignment or decision permission.
- Check whether the submission has already moved to another stage or final status.
The author or reviewer did not receive an email
- Confirm the recipient address and scheduled conference shown in the action.
- Check the submission discussion, reviewer status, activity, and mail information before resending.
- Ask the recipient to check spam or junk folders.
- Have the administrator test the outgoing email configuration.
The article was published but is not visible
- Confirm that the article is Published rather than Draft, Scheduled, or Unpublished.
- Confirm that the assigned proceeding is Published.
- Check the public navigation link and proceeding page.
- Clear relevant site caches only through the site’s approved process.
Payment Detail or invoice/receipt controls are missing
- Confirm that submission payments are enabled for the scheduled conference.
- Check whether a billing record exists for the submission.
- Verify invoice and receipt settings.
- Confirm that your role is allowed to view or manage payment details.
Final Manager and Editor Checklist
- The user has the correct role in the correct scheduled conference.
- The submission’s current stage, status, track, and latest review round are confirmed.
- Reviewers received only the permitted files and appropriate deadlines.
- Revision requests and editorial decisions are recorded in the correct round.
- Required discussions have been answered or closed.
- Publication metadata, contributors, files, permissions, and additional data are complete.
- Payment requirements are satisfied or an authorized manual settlement is documented.
- The correct proceeding is assigned and its status is appropriate.
- The article has been previewed before publication.
- The public article, proceeding page, and website navigation have been tested.
Result: The editorial history is complete, the article is assigned to the correct proceeding, and the public record matches the approved submission.


